
How to use a REST API
Introduction
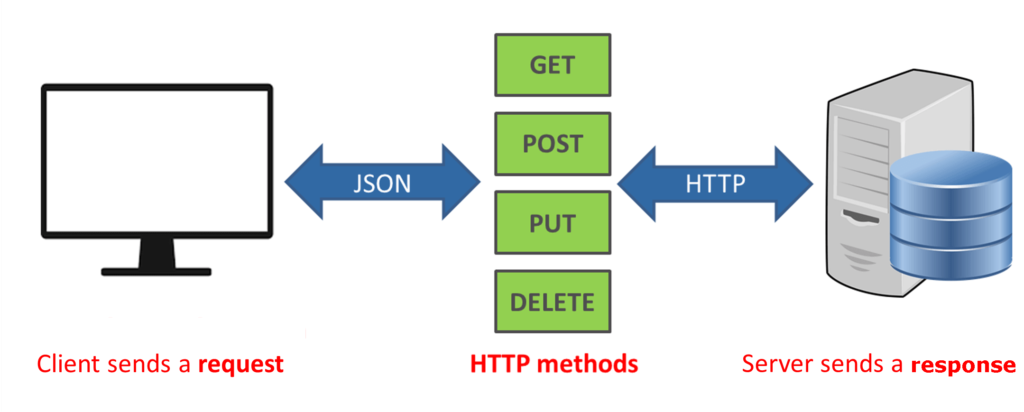
A REST API (sometimes also called a “web API” or just “API”) is a web standard for creating API (Application Programming Interface) services. REST APIs allow communication between different software systems and enable the transfer of data over HTTP (Hypertext Transfer Protocol). Unlike a web server that serves up web pages consisting of HTML, CSS, and JavaScript, REST APIs are used by clients to interact with other software systems, often for saving and querying data.
Most web apps and phone apps will make requests to REST APIs for third party data (for example many apps that use your location to find services near you will often use Google’s map API). Along with Google, many popular tech companies provide their own APIs allowing other software systems to integrate with them. This provides many great opportunities for developers to integrate with well-known tools and provide new and creative solutions to end users and businesses.
Endpoints
Data for REST APIs are organized into resources, each of which will typically have its own set of endpoints. For example, a REST API may provide a resource called “students” that represents students at a university. Typically, that resource will be broken into endpoints for the following tasks:
- Getting a list of all the students
- Getting a single student (usually by some kind of id)
- Creating a new student
- Updating an existing student
- Deleting an existing student
Each of these are differentiated by the HTTP method that is being used (more on that later). The operations listed here are often known as “CRUD” operations, which is an acronym for Create, Read, Update, and Delete. While more complicated services often have endpoints that provide more functionality than just the simple CRUD operations, the existence of these basic operations are so common that they get their own nickname. There are often cases where these are the only operations that are needed on a REST API, resulting in frameworks built to simplify writing code to execute these operations.
To identify each resource, a URI is used. Just like making a request to a given webpage, a request to access a REST API resource is going to be made up of an IP address and a path. Each API does things a little differently, but REST designates a basic pattern for generating URIs to access resources as seen in the following examples.
http://www.mycoolsite.com/api/resource/<id>
http://www.mycoolsite.com/resource/<id>
Some REST APIs will clearly separate all REST API URIs by having “api” included in the path, particularly when it’s a site that has web pages that use the same base address as the REST API. Having “api” in the URI is not a requirement for REST, it’s just a common practice I’ve seen a lot and often use myself.
The “<id>” on the end of the URI usually depends on what the endpoint does. I mentioned above that each resource will typically provide endpoints for CRUD operations, and for some of those endpoints an id will be needed while in others it isn’t used. For example, referencing our student example from earlier, creating a new student or reading the whole list of students doesn’t require an id whereas updating, deleting, and getting a specific student all require an id. For example, we’ll likely have two different URIs for our students (and assuming we’re using the version with “api” in the URI) we get the following:
http://www.mycoolsite.com/api/students/1
http://www.mycoolsite.com/api/students
We only have two URIs, but I have mentioned five endpoints (1- Get all students, 2- Get single student, 3- Update student, 4- Create new student, 5- Delete student). The REST API doesn’t just use the URI to determine the endpoint called but also the HTTP method. (I’ll be covering HTTP methods shortly). In general, a URI should identify the collection and designate a single element by id when a single element is selected. These scenarios don’t cover every case. Sometimes more complicated collections exist and other parameters need to be passed. I’m not sure if I want to cover more complicated examples in this article.
// Example of finding a specific class the student has taken. (Think of other examples of multiple arguments for a single endpoint)
http://www.mycoolsite.com/api/students/2/classes/5
Methods
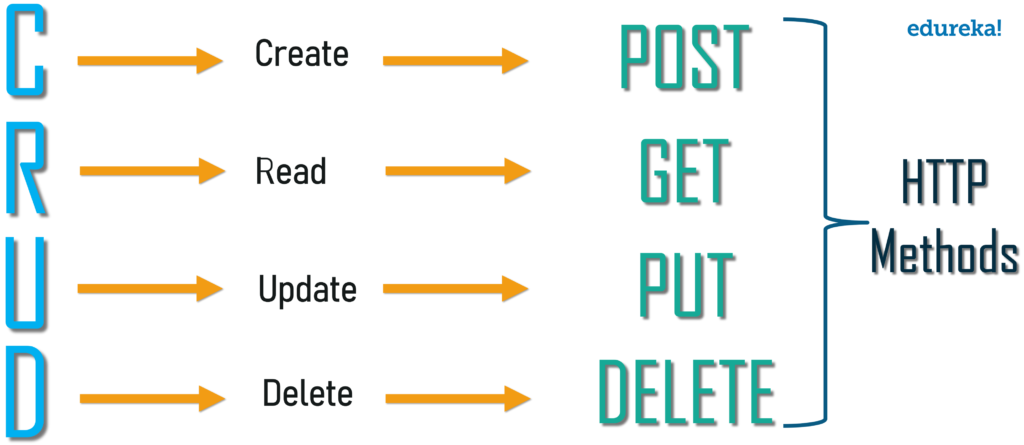
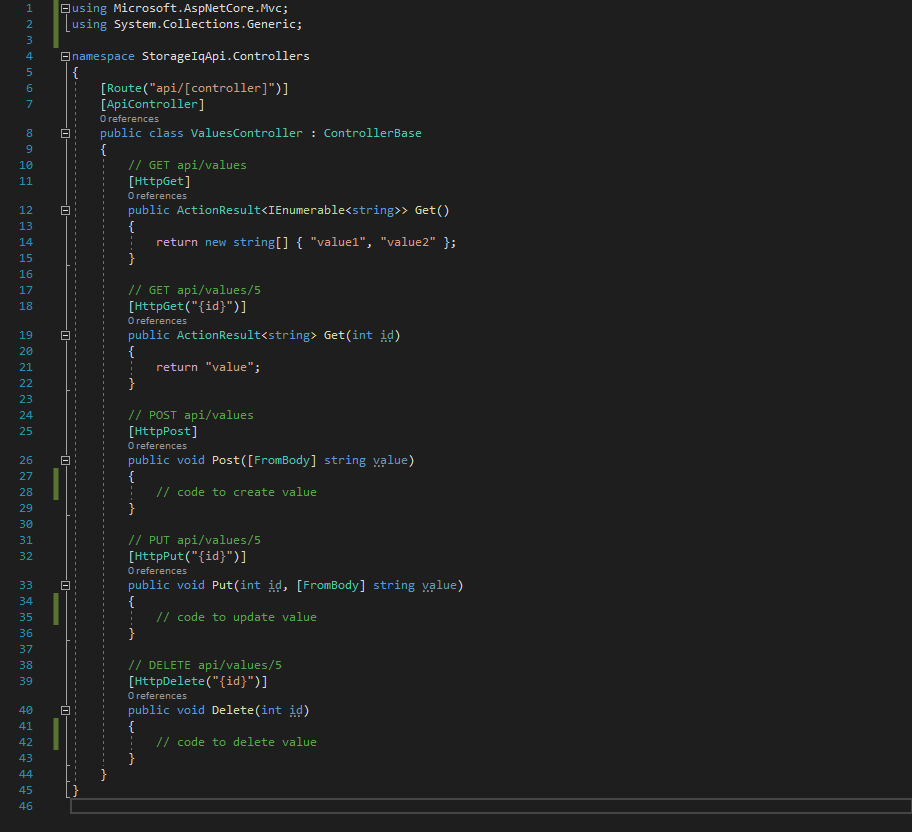
As I mentioned above, in addition to the URI, the HTTP method will determine what endpoint is hit. In REST, the following HTTP methods are commonly used for the given tasks.
- GET — Retrieves a resource
- PUT — Updates a resource
- POST — Creates a resource
- DELETE — Deletes a resource
A REST API endpoint will look at the request method to determine what endpoint, and thus which operation, it will execute for a given URI. Using our students example, we have the following endpoints:
// Get all students
GET http://www.mycoolsite.com/api/students

// Get a single student by id
GET http://www.mycoolsite.com/api/students/1

// Update an existing student by id
PUT http://www.mycoolsite.com/api/students/1
// The record will be updated with the data contained in the following body
{
    "name": "Bob Smith",
    "email": "BobSmith@example.com"
}

// Create a new student
POST http://www.mycoolsite.com/api/students
// A new record will be created with the data contained in the following request body
{
    "name": "New Student",
    "email": "NewStudent@example.com"
}

// Delete an existing student by id
DELETE http://www.mycoolsite.com/api/students/1
In the example above, have only two URIs, but we have 5 different endpoints differentiated by each HTTP method. Unlike GET and DELETE, the PUT and POST methods contain a request body whose data is used to update or create a new student respectively.
The body of the PUT method will replace the value for the fields of that student record. If you only want to update the email address for that student, then you’ll send the same name of the student in the request and the new email address. In our example, if we wanted to change Bob Smith’s email address to BobSmith@newwebsite.com, then we’ll use the following body in the JSON request:
{
    "name": "Bob Smith",
    "email": "BobSmith@newwebsite.com"
}
Notice how we include both the name and email fields even though we only want to update the email field. PUT simply takes what is passed into the body and will update that resource to match the fields passed in the body. If you accidentally pass “Robert Smith” instead of “Bob Smith” along with the email address you want to change, both the name and the email address will be changed to the new values.
Status Codes
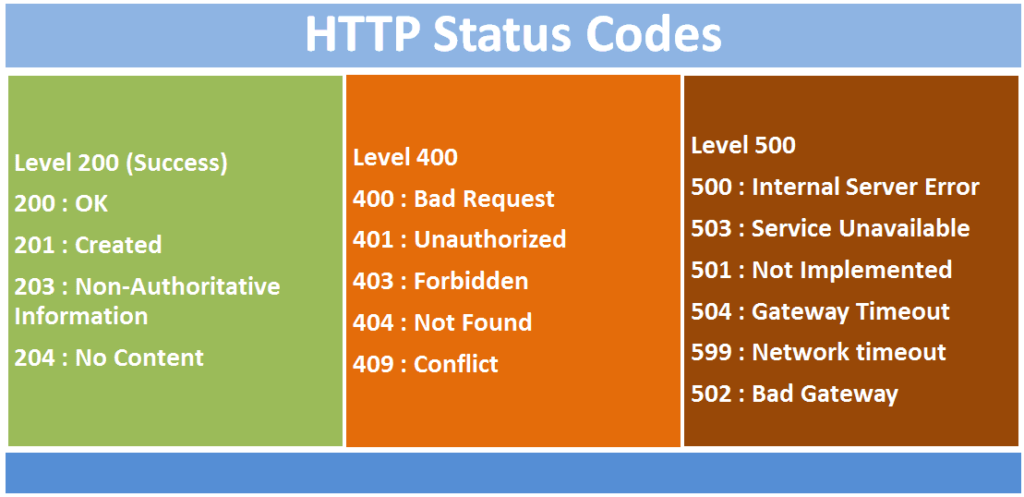
REST APIs return standard HTTP status codes to indicate the success or failure of a request. These status codes describe the overall result of the request, and are useful when debugging what went wrong when a failure occurs.
In HTTP/S any 400 status code (status codes in the range 400-499, a.k.a. “4xx) indicates client error, meaning the client request is invalid in some way. 400 errors must be fixed on the client side and do not indicate an error on the server. A 500 status code (status codes in the range 500-599, a.k.a. “5xx”) indicates a server error, and as such can only be fixed by the owners of the server. 200 status codes (status codes in the range 200-299, a.k.a. “2xx”) indicates the request was successful.
The most common 400 error codes I’ve seen in my years working as a full-stack engineer are 400, 401, 403, and 404.
A 404 status code means that the resource was not found. So for our students example, if you sent the following request when no student with an id of 123 exists, then you’d get a 404 error.
PUT http://www.mycoolsite.com/api/students/123Both 403 and 401 are closely related. 401 means the user is unauthorized. We’ll talk later about authorization and authentication, but, in general, you’ll often need to login to get access to a given API endpoint. For example, if you’re accessing Facebook’s API to access your account data, you need to be logged in, otherwise you’ll get a 401 Unauthorized error.
The 403 status code means “Forbidden.” This happens when you’re logged in, but you do not have the permissions to access that resource. In our students example, you may have authorization to view existing students, update your own student records, create a new student record or delete any of your own student records. If you attempt to modify or delete someone else’s, then you’ll get a 403 “Forbidden” error.
In short, you’ll get a 401 if you haven’t logged in, and you’ll get a 403 error if after logging in, you attempt to access a resource your user does not have permission to access.
Typically any other kinds of client side errors will simply return a 400 Bad Request error. In our students example, we may decide that a valid student must have a name and not an empty string. If someone sends in a request to create a new student without a name, then that endpoint will return a 400 Bad Request, typically with an error message indicating what went wrong. In our case, it’ll be a message letting us know that the name is missing.
After doing all the validation in code for all the possible 400 requests that the server could return (i.e.: checking for authorization/authentication, checking that it’s getting what is expected in a request), then typically the endpoint will catch any other exceptions and return a 500. This is a case that REST API server owners don’t ever want to happen since the user will only be able to determine that something went wrong on the server side. That being said, I’ve seen plenty of examples while working on REST API servers when validation that should have been done was missed, and so we ended up with a 500 when we should have returned a 400 or 404 with an appropriate error message. If you’re building a client to access an endpoint, this means that if you get a 500, you still might be able to fix it by double-checking that you’re sending the correct data to the server. Otherwise, a 500 should only indicate that something went wrong on the server side and needs to be fixed.
The success status codes I’ve seen used almost exclusively are 200 OK and 204 No Content. The 200 OK is used in almost every case. The times I see 204 No Content is on Put, Post, or Delete (or some combination of the 3). In these cases, we are just expecting PUT, POST, and DELETE to do what we expect them to do (update, create, or delete) and indicate success when they’re done. However, I’ve often seen other REST API servers return the object that was updated, created, or deleted in case the client needs to use it for something else.
For our student example, we may want to be able to display the new student after it is created with that student’s id number and any other info. The POST endpoint will create the unique id (since if it was left up to the client, you run the risk of having id clashes). If the POST returns the data of the newly created student with the new id, then the front end can display that new student immediately. If the POST returned 204 No Content, then the front end would need to make an additional call to the REST API to get the new student. The decision to use a 200 or a 204 is often going to be chosen on a case by case basis and may change as the system evolves with new requirements.
Protocol for sharing data (JSON and sometimes XML)

The requests and responses between the clients and REST APIs are made up of either XML or JSON, though JSON is far more common because it is lightweight and easy to parse. In my experience, I’ve never worked with a REST API that used XML; they’ve always been JSON. As such, I’ll briefly go over JSON itself.
If you’re familiar with JavaScript, JSON is a very natural to pick up. It ultimately passes data as a set of key-value pairs. The keys are passed as strings whereas values can consist of primitive types like numbers, strings, and booleans or nested objects. You can nest objects as deep as you want, but each must ultimately resolve to values that are made of primitive types only.
{
    "field1": "string",
    "field2": 6,
    "field3": true,
    "objectField": {
        "first": "This is a string",
        "second": 55,
        "third": false
    }
}
Notice that the entire JSON object is enclosed in braces (“{“, “}”) signifying that it is enclosing all the listed key-value pairs as an object. Arrays can also be used in JSON. Here’s an example of a field that contains an array:
{
    "name": "Bob Smith",
    "age": 33,
    "phoneNumbers": [8005551234, 8005554321, 8005552244]
}
An array is designated simply by enclosing a list of comma-separated values in brackets (“[” and “]”). We can also have an array of nested objects as follows:
{
    "name": "Bob Smith",
    "age": 33,
    "phoneNumbers": [8005551234, 8005554321, 8005552244],
    "contacts": [
        {
            "name": "John Smith",
            "age": 31,
        },
        {
            "name": "Suzy Jones",
            "age": 35
        }
    ]
}
Just like primitive types, each nested object is enclosed in brackets and separated by commas to indicate each element in the array. The entire JSON body passed over the wire can also be an array.
[
    {
        "name": "Bob Smith",
        "age": 33,
    },
    {
        "name": "John Smith",
        "age": 31,
    },
    {
        "name": "Suzy Jones",
        "age": 35
    }
]
When sending requests from the client, you’ll want to make sure your data is in the format expected by the Web API. The frontend frameworks I’ve used are React and AngularJS, and in both of those, I’ve used the axios library to send and receive requests. Because these frameworks are using JavaScript (or TypeScript which is a superset of JavaScript), you’re creating JSON objects directly in the code that axios can convert to text and send over the wire to the REST API.
Authentication and Authorization

Most REST APIs have sensitive data they want to control access to. For example, if you want to use Google’s Drive API so that you can have an app or a website that saves files or reads files from a user’s Google Drive, the app needs to be able to access that user’s data and that user’s data alone. In order to do this, anytime you make a request to access Google Drive, you’ll need to go through a login process to verify who you are (authentication) and determine what you have access to (authorization).
I’ve specifically used OAuth (and the subject of OAuth can be several posts itself, so I’m going to give a really basic overview of authentication and authorization with a REST API). Essentially, when making a request to a REST API that requires a login, the REST API will provide a modal the user can be redirected to in order to sign in with that service directly, and if the sign in is successful, a token or key will be returned that your additional requests will include in the Authorization header of later requests. This key will be used by the REST API to verify that you have access to the resources you’re requesting. As mentioned above, if you are making requests to an endpoint that requires a login without the kind of token the REST API is expecting, then you’ll get a 401 status code error. Otherwise, if you are logged in, but the REST API determines that your token doesn’t grant you access to a particular resource, then you’ll get a 403 error (for example if you are attempting to access a different user’s Google Drive files).
There are plenty of REST APIs that have open endpoints that don’t require any kind of login, and when playing with your own to see how it works, you don’t need to set up logins immediately and instead get a feel for creating open endpoints and making calls to them from your client. However, once you start wanting to store user data so they can come back to a personalized profile, you’ll need to implement some kind of security. There are many options out there, but a couple popular ones are Auth0 and Microsoft Identity Server. You can even build your own (though I wouldn’t recommend it if you’re going to be using it in the real world to store sensitive information) to learn more about some of the problems and processes in building a solution that provides login functionality.
Conclusion
Learning about REST APIs really opens you up to a lot more possibilities in working with other online software services. Many of them require you to pay since they have valuable data and functionality that you can integrate with. Others are free because they are giving access to public information or run by organizations interested in sharing data. Taking the time to learn how to interact with or build your own REST APIs will give you more opportunities. Furthermore, this is largely a part of modern web development (front end, back end, and full stack all need to know this) as well as mobile (since often they’ll make web requests to REST APIs for the data they’re working on.