
How do I use Redux with React
Check out this github repo for an example
What is Redux?
Redux is a very popular framework for managing application-level state in React apps. It is an open-source project that has evolved over time to make managing state simpler. Previous versions of Redux required a lot more boilerplate code and were more difficult to manage.
Redux General Overview
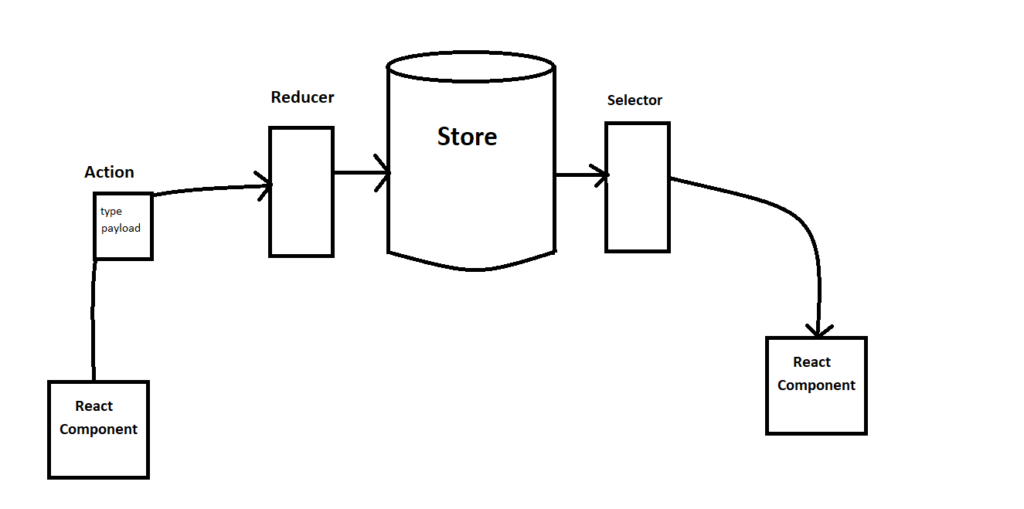
In general, Redux is made up of a store that holds all of your application-level data (that is, all of your data that you want shared across your application). The store is updated a reducer (also called a “reducer function”). When something wants to update the store (in this example, a React component), then it sends an action which consists of a type and a payload. The type is used by the reducer to determine what exactly should be updated (and how it should be updated). The action payload contains the data needed to perform the update.
For example, you might have a reducer for updating a customer, so then you’ll likely have an action type of “UpdateCustomer” and a payload with customer data that is then used to update the store. The action type is a string that is used by the reducer to determine what to do. Historically, this was often contained in a switch statement.
When retrieving data from the store, a selector is used, which queries the store for data, then passes that data to the caller. This side of the Redux store is less complicated than the update side (and has always been easier for me to understand).
With the latest iterations, more has been added to the framework to make it more intuitive to use. We’ll be reviewing an example featured on the Redux website — Getting Started with Redux.
Redux-toolkit
When setting up Redux, you’ll want to use redux-toolkit.
# NPM
npm install @reduxjs/toolkit

# Yarn
yarn add @reduxjs/toolkit
This contains the core Redux library and the packages and tools to follow Redux best practices. This package helps mitigate the errors and pitfalls you’ll run into while using Redux. The Redux community recommends that you use the toolkit rather than attempting to build on top of Redux core directly.
Slices
As mentioned above, Redux contains a “store” which contains every piece of information we want to share across a React application. As your application grows, the store also naturally grows and can end up getting really huge. To avoid the ensuing mess that can be caused by this, we break the store into “slices” that represent logical pieces of information that you’re going to store in your application. For example, you may need to keep track of customers, products you sell, different stores, etc. You would then likely end up with a customer slice, a product slice, a store slice, and so forth.
With redux-toolkit, when a slice is created, it takes care of the details under the hood. We’ll be referencing this GitHub repository which contains the code from the intro video found on the Getting Started with Redux page. In our GitHub example, we have the counterSlice which is used to demonstrate setting up a slice in Redux.
import { createSlice, PayloadAction } from '@reduxjs/toolkit';

interface CounterState {
  value: number;
}

const initialState: CounterState = {
  value: 0,
};

const counterSlice = createSlice({
  initialState,
  name: 'counter',
  reducers: {
    incremented(state) {
      // it's okay to do this because immer makes it immutable
      // under the hood
      state.value++;
    },
    amountAdded(state, action: PayloadAction<number>) {
      state.value += action.payload;
    },
    // decrement -- left for you to implement if you want to practice
    // reset -- left for you to implement if you want to practice
  },
});

export const { incremented, amountAdded } = counterSlice.actions;
export default counterSlice.reducer;
The createSlice function handles setting up the action creators and reducer functions so that everything works under the hood. Having used earlier versions of Redux, I was happy to see so much of the extra functionality being handled in the background. However, for me, it also took some time to be able to understand how this works since so many of the details are handled under the hood.
Setting up initial state for Redux slice
The first piece of setting up our slice is defining the slice of data the slice will contain and the initial values for that data (conventionally called “initial state”).
interface CounterState {
  value: number;
}

const initialState: CounterState = {
  value: 0,
};
To start, we define an interface named something that would make sense for the data stored in this slice. Since this is representing a counter, “CounterState” seems like a fair choice. Ultimately, this interface defines the fields the state will contain and also allows for clear type checking by TypeScript.
The next line we set up the initial state for our slice. This can be set to any values that makes sense for your application. The point here is that this is the initial data that our Redux slice will contain before any updates are made. To actually include the initial state in Redux, we include as one of the fields in the object passed to the createSlice function.
const counterSlice = createSlice({
  initialState, // This is where we include our initial state to be stored in Redux

  // ...remaining pieces of passed object hidden here
});
How actions and reducers work
The createSlice function takes care of creating our actions and reducers whereas before these all had to be created by hand. The key pieces of this are the name and reducer fields we pass into the createSlice function. The name is used to create the action creators under the hood, and since redux-toolkit uses information about where the slice is located as part of the action creator name, you don’t need to worry about choosing a unique value for the name field, but it does need to be included.
name: 'counter',The name “counter” here fits what the slice represents and makes it more readable for someone coming back to look over your code. The fact that redux-toolkit provides this functionality saves so much headache from earlier versions. It used to be that when you coded your action creators, you had to make sure you were picking unique names, and it was also often based off of file path or nested classes, but it made it harder to read what your actions were.
The reducers are defined as individual functions in the “reducers” object passed into createSlice.
reducers: {
    incremented(state) {
      // it's okay to do this because immer makes it immutable
      // under the hood
      state.value++;
    },
    amountAdded(state, action: PayloadAction<number>) {
      state.value += action.payload;
    },
    // decrement -- left for you to implement if you want to practice
    // reset -- left for you to implement if you want to practice
  },
Notice each reducer function takes an argument (conventionally called “state”) which represents the slice data that is going to be changed and an optional action payload. Previous versions of Redux would see a reducer function set up for each slice that would take an action and have a switch statement to execute some kind of update based on the action type. This is all handled under the hood by having a single reducer function represent each type of update an action can make.
incremented(state) {
  // it's okay to do this because immer makes it immutable
  // under the hood
  state.value++;
},
The first reducer function just updates the state. Because we don’t need any action payload, we can omit it from the function definition. Under the hood, an action is still created and dispatched to a reducer, but redux-toolkit gets around those details so that it’s just understood that we’re updating the state when this function is called.
The other huge thing that was difficult for me to get around coming from earlier versions of Redux is the fact that it looks like we’re directly mutating the state. In earlier versions, we used the spread operator to ensure that the state was updated to a new object reference to ensure all of our React components relying on a state change were properly updated.
state = { ...state, value++ };It was easy to forget to use the spread operator and end up with defects where state wasn’t getting properly updated. With immer in redux-toolkit, we can get around worrying about whether we’re updating with the spread operator or not since immer essentially ensures that even if we’re updating the state directly, it still creates a new object reference, which allows Redux to ensure React components relying on those updates are properly notified and sync with the correct data.
The second reducer function was included to demonstrate how we use an action payload to provide new data to update the state.
amountAdded(state, action: PayloadAction<number>) {
  state.value += action.payload;
},
Just like the first reducer function, we can use the same syntax for updating state without using the spread operator. In this function, we update the counter with a specific value that is passed in our action payload. We just grab the data from the action payload and use it to update the state as expected. I’ve found that in most cases, I use an action payload because I have a specific update that needs to be made. The counter example above was a great example to demonstrate that we don’t need to pass the action into every reducer function.
Lastly, we export our actions and reducer that are included with the slice that has been created.
export const { incremented, amountAdded } = counterSlice.actions;
export default counterSlice.reducer;
The createSlice method created an action for each of our reducer functions. All the work was done under the hood so that all you need to remember are the functions that you defined for updating your state. The reducer that is exported is incorporated into the overall Redux store (which is composed of the reducers for each slice contained in the Redux store).
Setting up the Redux Store
The Redux store holds all of the data we want to share across the application and is made up of all of our slices we define. After creating a slice, we add it to our Redux store. The following is an example of our store (modified from the let’s learn React with Jason repository) which contains our counter slice.
import { configureStore } from '@reduxjs/toolkit';
import counterReducer from '../features/counter/counter-slice';


export const store = configureStore({
  reducer: {
    counter: counterReducer,
  }
});

export type AppDispatch = typeof store.dispatch;
export type RootState = ReturnType<typeof store.getState>;
We import our counterReducer from the slice we just created, and the store just takes in the reducer from the slice. The reducer defines how updates are made to that particular slice, and so when making updates for that particular item in the store, the corresponding reducer we defined in the slice is called.
export const store = configureStore({
  reducer: {
    counter: counterReducer,
  }
});
When we call “configureStore” it expects a reducer object that is made up of all the slices that need to be contained in the store. In our case, we have a counterReducer, which is called “counter” after the name we gave our slice above. This value is specifically used when we want to get the slice data we need from our store, which we’ll see shortly.
Lastly, we export the types listed in the store so that we can utilize TypeScript to help determine the data we’re dealing with when updating the store and pulling from the store.
export type AppDispatch = typeof store.dispatch;
export type RootState = ReturnType<typeof store.getState>;
We’ll specifically see this in the new Redux hooks following.
How to use Redux Hooks
A massive simplification in Redux-Tools is the fact that they have moved to using hooks so that you no longer need to use the connect API to wire React components to the Redux store. Now you can simply call hooks to select data from and dispatch actions to the Redux store.
import { TypedUseSelectorHook, useDispatch, useSelector } from 'react-redux';
import { RootState, AppDispatch } from './store';

export const useAppDispatch = () => useDispatch<AppDispatch>();
export const useAppSelector: TypedUseSelectorHook<RootState> = useSelector;
The two hooks for Redux are useDispatch and useSelector. As the naming implies, useDispatch is used to dispatch actions to the store and useSelector is used to get data from the store. In our case here, we use the types we exported from the store to give type context to our hooks. This makes it easier when we’re coding to get help from TypeScript, both in terms of auto-fill and in terms of type-checking safety when building our app.
export const useAppDispatch = () => useDispatch<AppDispatch>();
export const useAppSelector: TypedUseSelectorHook<RootState> = useSelector;
Specifically, in these lines, we generate our own dispatcher that wraps the useDispatch function, but it has been set to the type AppDispatch that we exported from our store. This ensures that typescript recognizes the actions we’re able to dispatch to the store (and as you may remember above, the actions are just named like the functions registered as reducers for our slice).
The useAppSelector uses the TypedUseSelectorHook to set the type of our redux store from useSelector so that when we use it later, we get type checking in much the same way as the dispatch above. You can still use the hooks directly (useDispatch and useSelector), but they won’t give you the type safety that you get by wrapping them as we’ve done here.
Using Redux in a React Component
Here is where we tie everything together. We are now able to use our Redux store to manipulate a counter in a React component. Below we have our complete React component. I’ll talk about each of the pieces below.
import React from 'react'
import { useAppDispatch, useAppSelector } from './app/hooks';
import { incremented, amountAdded } from './features/counter/counter-slice';
import logo from './logo.svg'
import './App.css'

function App() {
  const count = useAppSelector((state) => state.counter.value);
  const dispatch = useAppDispatch();

  function handleClick(num?: number) {
    if (num) {
      // increment by a fixed amount
      dispatch(amountAdded(num));
    } else {
      // increment by 1
      dispatch(incremented());
    }
  }

  return (
    <div className="App">
      <header className="App-header">
        <img src={logo} className="App-logo" alt="logo" />
        <p>Hello Vite + React!</p>
        <p>count is {count}</p>
        <p>
          <button onClick={() => {handleClick()}}>
            increment by one
          </button>
          <button onClick={() => {handleClick(5)}}>
            increment by three
          </button>
        </p>
      </header>
    </div>
  )
}

export default App
We start by importing our new hooks and our actions exported from the slice.
import { useAppDispatch, useAppSelector } from './app/hooks';
import { incremented, amountAdded } from './features/counter/counter-slice';
If you remember from above, these actions were defined in our slice as follows:
const counterSlice = createSlice({
  name: 'counter',
  initialState,
  reducers: {
    incremented(state) {
      // it's okay to do this because immer makes it immutable
      // under the hood
      state.value++;
    },
    amountAdded(state, action: PayloadAction<number>) {
      state.value += action.payload;
    },
    // decrement
    // reset
  },
});

export const { incremented, amountAdded } = counterSlice.actions;
These are the actions we dispatch when we want to update our counter state. At the beginning of our component, we define our initial count by using the selector and define the dispatch function we’ll be using to dispatch our actions to the store.
const count = useAppSelector((state) => state.counter.value);
const dispatch = useAppDispatch();
The selector takes a function that takes our state argument, and since we wrapped our hooks with type safety, the useAppSelector hook recognizes the state argument as representing the type defined for our store. At this point, our store contains only the counter (if you recall below the definition we have for the store indicating this):
export const store = configureStore({
  reducer: {
    counter: counterReducer
  }
});
Then if you remember, the counterReducer gives us the defined slice:
interface CounterState {
  value: number;
}
With the useAppSelector hook, we get the values from the state that we’re looking for with the type safety that TypeScript gives us. For dispatching our actions, we have created two simple buttons for demonstration that call the same click handler.
function handleClick(num?: number) {
    if (num) {
      // increment by a fixed amount
      dispatch(amountAdded(num));
    } else {
      // increment by 1
      dispatch(incremented());
    }
  }
The dispatch function dispatches the action that is passed to it. In our case, we have the two actions we’ve exported: amountAdded and incremented. The first takes a payload of type number, and the second has no payload. As such, we can see the first action (amountAdded) called with num passed into it and the second action with no argument passed in at all.
To tie it all together, here’s the React component again:
import React from 'react'
import { useAppDispatch, useAppSelector } from './app/hooks';
import { incremented, amountAdded } from './features/counter/counter-slice';
import logo from './logo.svg'
import './App.css'

function App() {
  const count = useAppSelector((state) => state.counter.value);
  const dispatch = useAppDispatch();

  function handleClick(num?: number) {
    if (num) {
      // increment by a fixed amount
      dispatch(amountAdded(num));
    } else {
      // increment by 1
      dispatch(incremented());
    }
  }

  return (
    <div className="App">
      <header className="App-header">
        <img src={logo} className="App-logo" alt="logo" />
        <p>Hello Vite + React!</p>
        <p>count is {count}</p>
        <p>
          <button onClick={() => {handleClick()}}>
            increment by one
          </button>
          <button onClick={() => {handleClick(5)}}>
            increment by three
          </button>
        </p>
      </header>
    </div>
  )
}

export default App
Redux has a lot of extra details that can be difficult to learn. Redux-tools really helps clean it up, and this was a really simple demo on how to set up Redux using redux-tools. It’s highly recommended you use redux-tools because it provides an opinionated framework to help take some of the pain out of using Redux and to help establish best practices when building up a store that is used in your application. I encourage you to download the repo and give it a shot.